
Preparing for Carpet Removal
Assessing the Carpet and Room
Evaluating the Carpet’s Condition
Before you start pulling up that old carpet, it’s essential to take a moment to assess its condition. Look for areas that might be heavily soiled, water damaged, or have pest infestations. These issues can make removal more complex and require specific precautions. For example, areas with mold might require special handling to avoid spreading spores, and any signs of pests might indicate that professional pest control services are needed. Understanding these factors will help you plan your removal process more effectively and safely, and will indicate the necessity for a professional service that will know how to approach these issues properly.
Identifying Potential Hazards
Carpet removal may seem straightforward, but there are several potential hazards to be aware of. Sharp objects like tack strips, staples, and nails can cause injuries if you’re not careful. Old carpet can also harbor dust, allergens, and even mold, which can affect your respiratory system. Additionally, lifting heavy rolls of carpet can lead to back strain if you don’t use proper techniques. Professional carpet removal services understand these hazards and have the expertise to manage them safely, with the right equipment, and proper training. Therefore, if you’re not sure how to approach this job safely, it’s best to seek help from the experts.
Preparing the Room
Preparing the room before removing old carpet will help streamline the process and protect your belongings. You’ll want to remove all furniture, decorations, and any other items from the room. This will give you a clear work area and prevent damage to your possessions. Consider opening windows for ventilation, as carpet removal can generate dust and odors. Remember to also turn off any electrical devices and cover or remove any sensitive electronics. Professionals are usually better equipped to handle this part of the process, saving you time and effort.
Gathering Necessary Tools and Materials
Essential Tools
Having the right tools on hand is crucial for efficient and safe carpet removal. Some essential tools include a utility knife or carpet cutter for making precise cuts, pliers or a pry bar for removing tack strips, work gloves to protect your hands, and trash bags for disposal. You’ll also want to have a hammer or a staple remover, to help with stubborn staples or nails. Professionals will have a range of high-quality tools that are specifically designed for carpet removal, ensuring the job is done effectively and safely.
Safety Equipment
Safety should be your top priority when removing carpet. Essential safety gear includes a respirator or dust mask to avoid inhaling dust and allergens, safety glasses to protect your eyes from debris, and heavy-duty work gloves to prevent cuts and scrapes. Knee pads are also helpful, to protect your knees from the hard floor. Professionals use specialized safety equipment to minimize risks, ensuring the process is done safely, and without any health hazards.
Disposal Supplies
Proper disposal of old carpet is essential to keep your home clean and avoid cluttering your space. Large heavy-duty trash bags are needed to contain the removed carpet and padding, and you may need a dumpster or truck for larger projects. Be aware of your local waste management rules for carpet disposal. Professionals are typically able to handle carpet disposal as part of their service, saving you the hassle and time of dealing with it yourself.
Step-by-Step Carpet Removal Process
Cutting the Carpet into Manageable Strips
Making the First Cut
The first cut in the carpet is crucial, as it will set up the entire removal process. Start by using a sharp utility knife or carpet cutter to make a long cut along one wall. Be careful not to cut into the subfloor beneath the carpet. Once you’ve made the initial cut, you should be able to lift the edge of the carpet to make the next steps easier. Professionals are very experienced in this part of the process, making the correct cuts, and taking care not to damage anything.
Cutting in Sections
After your first cut, you’ll want to cut the carpet into strips, usually around 2-3 feet wide. This will make it easier to manage and roll for removal. Make the cuts parallel to the walls, being careful not to cut the subfloor, or any wiring hidden underneath the carpet. It may take you some time and effort to properly cut through the carpet, especially if the carpet is thick, old, and/or heavily soiled. Professionals will be able to complete this process quickly and efficiently, because of their specific tools and techniques.
Rolling and Securing Strips
As you cut the carpet into strips, roll them up tightly and secure them with tape or rope. This will make them easier to handle and remove from the room. You’ll probably want to wear gloves for this part of the job to avoid getting the carpet’s dust and dirt on your hands. Heavy-duty trash bags are a good option to secure the rolls, especially if they’re large, and will help to keep the area clean. Remember that if the carpet is too heavy, you’ll want to cut it into more pieces. Professionals are trained to handle heavy materials, and they can usually remove the carpet efficiently, without any risk of injury.
Removing the Carpet from Tack Strips
Safely Pulling Up the Carpet
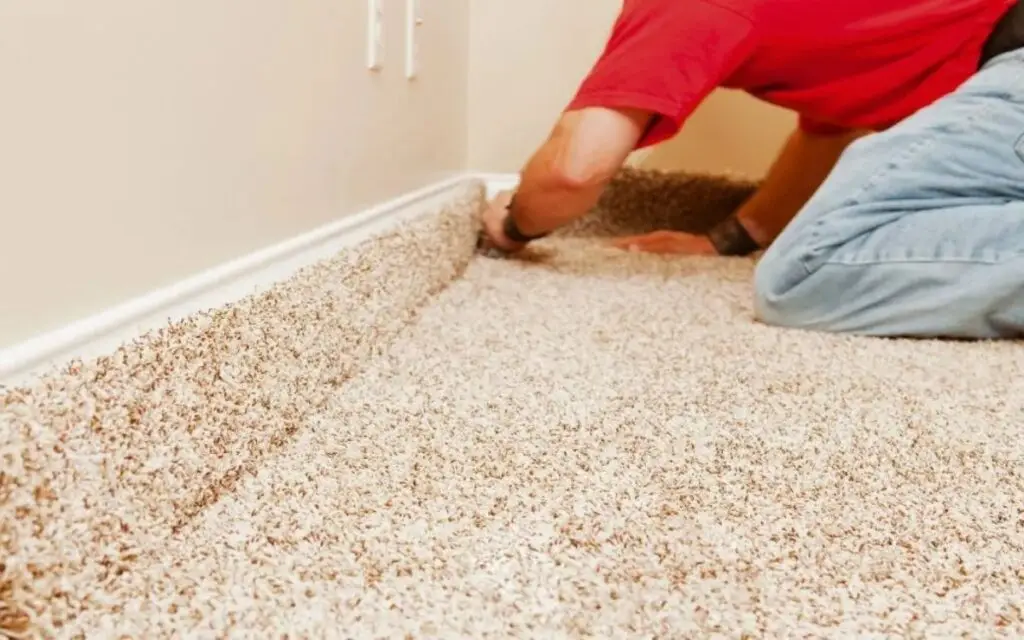
Once you’ve cut the carpet into strips, carefully pull each strip away from the tack strips along the walls. Be sure to move slowly to avoid tearing the carpet, and also be careful not to cut yourself on the sharp edges of the tack strips. If the carpet is old, it might be attached quite tightly, and it can be difficult to pull up. Professionals use the proper tools and techniques to remove the carpet from the tack strips carefully, reducing any chance of accidents or damage.
Using Pliers or a Pry Bar
For stubborn areas of carpet that are stuck to the tack strips, use pliers or a pry bar to carefully lift the carpet. Be gentle, and use leverage to lift the carpet, instead of ripping it, which can damage the subfloor. Start by lifting one corner, and then work your way along the tack strip, pulling up the carpet. Professionals have the tools and experience to manage these tough areas, ensuring a clean removal, without damaging the floor.
Dealing with Stubborn Areas
If you encounter stubborn areas of carpet that are particularly difficult to remove, try using a putty knife or flat bar to carefully work under the carpet, disengaging it from the tack strips. Patience is essential; avoid using too much force, which can damage the subfloor, or the strips. It is important to work slowly and carefully to ensure the job is done right. Professionals have the proper tools and techniques to remove even the most stubborn carpet safely, and efficiently.
Removing Carpet Padding
Lifting and Removing the Padding
Once the carpet is out of the way, you’ll need to address the padding underneath. In most cases, the padding is not attached too securely, and it can be simply lifted and pulled up. If the padding is glued down, you may need a scraper or putty knife to help detach it from the subfloor. As you remove the padding, check for any signs of damage, moisture, or mold underneath. Professionals are equipped to deal with any additional issues found beneath the carpet and the padding.
Dealing with Stapled Padding
In some cases, padding is secured to the subfloor with staples, which makes it more difficult to remove. Use a staple remover or pliers to carefully remove the staples, without damaging the floor. Be careful to remove all of the staples to prepare the floor for the next step. Professionals are experienced with all sorts of padding attachment methods, which allows them to remove it quickly and efficiently.
Preparing for Tack Strip Removal
After removing the padding, it’s important to prepare for the tack strip removal. Check to see that all of the carpet and padding are removed from the area, and that you have all of the necessary tools at hand. Make sure that the floor is clean before removing the strips, to prevent making a mess. Professionals handle this task efficiently, and will make sure to clean the floor before removing the tack strips.
Removing Tack Strips and Cleaning the Subfloor
Tack Strip Removal Techniques
Using a Pry Bar
Tack strips are usually secured to the subfloor with nails or staples, and require the use of a pry bar to remove them. Position the pry bar under the strip and gently lift to detach it from the floor, making sure not to damage the subfloor. You might have to use some force to remove them, but be careful not to damage the subfloor in the process. Professionals are very skilled at this task, making sure that the strips are removed safely and efficiently, without causing any damage.
Removing Nails or Staples
After you’ve removed the tack strips, you might need to remove any remaining nails or staples. This can be done with pliers or a staple remover. Be sure to remove them all, to prevent injury, and also to make sure that the floor is ready for the next stage. Professionals will handle the entire process carefully, leaving a clean and smooth surface, and ensuring that you are not left with a dangerous, unfinished floor.
Dealing with Stubborn Tack Strips
Sometimes, tack strips are very stubborn and can be difficult to remove. If the strips are stuck tight, use a hammer to gently tap the pry bar and provide more leverage to remove them. If the nails or staples are deeply embedded, use pliers or nail puller to carefully remove them, and be careful not to damage the subfloor. Professionals are experienced with all kinds of issues when removing the tack strips, making the process far easier and quicker than doing it yourself.
Cleaning the Subfloor
Vacuuming
Once you’ve removed all the carpet, padding, and tack strips, thoroughly vacuum the subfloor to remove any dust, debris, and loose particles. A shop vac is recommended for this task since it’s more powerful than a regular household vacuum. Make sure to vacuum all of the corners and edges of the room, ensuring that the floor is ready for the next steps. Professionals use industrial-grade vacuums that will ensure that the subfloor is completely clean and ready for the next step.
Scraping Adhesive
If you find any adhesive left on the subfloor, you’ll want to scrape it off using a floor scraper or a putty knife. Be careful not to damage the floor as you scrape the adhesive off. If the adhesive is stubborn, you might need to use a specialized adhesive remover. It’s important to clean the floor as much as possible before installing new flooring. Professionals use the proper tools to remove any adhesive residue, ensuring a perfectly clean floor for new flooring.
Inspecting for Damage
After cleaning, carefully inspect the subfloor for any damage, cracks, or uneven areas. It’s important to address these problems before installing new flooring. Any structural problems should be addressed with professional help to ensure a safe and durable foundation for your new floor. Professionals will do a complete and detailed inspection of the floor, which will help to avoid any potential problems down the line.
DIY vs Professional Carpet Removal
Challenges of DIY Removal
Physical Strain and Safety Risks
DIY carpet removal can be very physically demanding and poses a variety of safety risks. Lifting heavy rolls of carpet can lead to back injuries and cuts and scrapes are common from the tack strips. Inhalation of dust and allergens can cause respiratory issues. Without the right equipment or training, there is always a higher risk of injury when doing it yourself. Professionals are trained to handle these challenges, and they have the necessary tools to minimize the risks.
Potential for Floor Damage
Without proper techniques and tools, it is quite easy to damage the subfloor during carpet removal, especially when removing tack strips. Gouges, scratches, and cracks in the subfloor may require costly repairs before installing new flooring. Professionals have the expertise to avoid damaging the subfloor, ensuring a smooth surface for the next steps of your project.
Proper Disposal
Disposing of old carpet and padding can be challenging. Old carpet is bulky and often requires special disposal methods and possibly even fees. Professionals usually offer disposal services, which saves you the time and hassle of dealing with the old materials yourself. Professional help will usually be more efficient and more cost-effective, and will save you a lot of time and effort.
Benefits of Professional Removal
Efficiency and Speed
Professional carpet removers have the right equipment and expertise to complete the job quickly and efficiently. Their experience with carpet removal allows them to do the job in a fraction of the time, compared to DIY methods. This is particularly beneficial if you have a large area to clear, or simply don’t have much time. Hiring a professional will also save you the time and hassle of DIY methods, making the project much easier.
Expertise and Proper Techniques
Professionals use the proper techniques and tools to remove carpet without damaging the subfloor, which is crucial for the longevity of your new floors. Their knowledge ensures a clean and smooth removal, which minimizes the need for further repairs. They are also familiar with various types of carpet and their installation methods, allowing them to approach any kind of project effectively. This expertise is invaluable when it comes to carpet removal.
Comprehensive Service
Professional carpet removal services usually include removal of the carpet, padding, and tack strips, as well as cleaning and disposal of the old materials. This comprehensive service takes all the hassle out of the process, saving you both time and effort. With all of the stages and steps included, hiring a professional for the task is the easiest, and most efficient solution, and will guarantee that all the necessary tasks will be covered, from A to Z.
Cost Comparison: DIY vs. Professional
DIY Cost Factors
Tool Rental
Renting specialized carpet removal tools, such as a carpet cutter, tack strip remover, and shop vac, can be quite expensive. The rental costs can add up quickly, and these tools may not always be as efficient or as well maintained as professional equipment. If you need these tools for more than a single day, it can quickly become much more expensive than a professional service, so always calculate the costs beforehand.
Disposal Fees
You’ll likely need to pay disposal fees for old carpet and padding, which can add significantly to your overall costs. These fees depend on your location and the disposal method you choose. It’s important to check all the regulations to avoid additional penalties. Professionals often include disposal in their service fees, providing you with a fixed total cost, with no surprises.
Time and Labor
The time and labor required for DIY carpet removal can be significant, especially if you’re working alone. The process can be physically demanding and time-consuming, and might not always yield the best results. This investment of time and effort could be better spent on something else, so you need to take that into consideration when planning your next project. Hiring professionals will leave you time to focus on other things.
Professional Cost Factors
Service Costs
The cost of professional carpet removal varies depending on the size of the area, the condition of the carpet, and the complexity of the job. Although the initial cost might be higher than a DIY project, professional removal services often offer a better value overall, and will save you money in the long run. Before making a decision, be sure to compare multiple offers.
Included Services
Professional carpet removal services include removal of the carpet, padding, and tack strips, along with thorough cleaning of the subfloor. They also take care of the proper disposal of old materials, saving you the trouble and cost. By including all of these elements in one service, they often offer a better value for your money, which helps you avoid a lot of hassle and additional fees.
Long-Term Value
Although DIY might seem cheaper initially, professional carpet removal can offer a better long-term value by minimizing the risk of damage and costly repairs. Professional work also saves time, and effort, and most importantly, it provides a professional finish. By choosing a professional, you’re investing in a solution that will save you money, time and effort.
Examples and Case Studies: DIY vs. Professional
DIY Removal Mistakes
Damage to Subfloor Case Study
A homeowner decided to remove their old carpet and, in the process, ended up gouging their subfloor when removing the tack strips. This resulted in additional repair costs, and a delay in installing the new flooring, with added expense and frustration. This case clearly illustrates the risks of DIY removal, and how it can lead to expensive mistakes.
Incomplete Removal Case Study
Another homeowner, attempting to save some money, tried to remove their old carpet themselves, and failed to remove all of the staples, padding, and adhesive. They had to stop the new flooring installation, because the surface was not prepared properly, and the materials were not removed completely. This example shows how a DIY job can lead to an incomplete process and additional cost and delays.
Professional Removal Successes
Large-Scale Removal Case Study
A business owner hired a professional carpet removal company to remove carpet from their large office space. The professional team removed the carpet, padding, and tack strips quickly, without any damage to the subfloor, and disposed of the materials efficiently. This case highlights the efficiency and speed of professional removal services in large-scale projects.
Efficient and Safe Removal Case Study
A homeowner with mobility issues hired a professional to remove their old carpet. The professional team removed the carpet and cleaned the area safely, with no health risks or accidents. This case demonstrates the importance of professional services for homeowners who have health issues, and can’t handle difficult tasks.
FAQs & Answers
It’s generally not recommended to reuse old carpet padding. Padding wears out and loses its effectiveness over time. Reusing it can cause your new carpet to wear out more quickly and can also compromise the performance of your new flooring. Professional installation services usually recommend, and use, new padding for best results. It’s best to always choose a professional option to guarantee high quality results.
The best way to dispose of old carpet is to either take it to a local waste disposal facility or hire a professional who includes disposal in their services. Check your local waste management regulations to ensure that you’re complying with all of the rules. Many waste management facilities have special guidelines on disposal of construction waste, and might require you to transport the old carpet in specific ways. Professionals are very familiar with these rules and will take care of the entire process.
The time needed for carpet removal varies, depending on the size of the area and the complexity of the job. A small room can be done in a few hours, while a larger space can take a full day, or even more. Professionals can complete the same job much faster and more efficiently due to their experience and tools. DIY projects can take much longer, especially when you factor in the potential mistakes and required repairs.
It’s not recommended to remove carpet by yourself if you have back problems. Carpet removal can be physically demanding, and could make your condition worse. Professional carpet removal services are a much safer and more effective option for those with mobility issues, and they will be able to take care of the task safely, and efficiently, and without putting you at risk of further injuries.
Yes, hiring professionals for carpet removal is often worth the cost, due to their expertise, efficiency, and reduced risk of injury or damage. DIY projects may seem cheaper initially, but the risk of costly mistakes, the time and effort required, and safety issues make professional services a much better choice in most cases. By hiring an expert, you can be certain that the job will be done right the first time.


