
Understanding Floor Polishing
What is Floor Polishing?
The Process
Floor polishing is the process of using specialized equipment and abrasive compounds to smooth and shine the surface of a floor, which can greatly enhance its appearance, and protect its surface. It involves several steps, including cleaning, sanding (if necessary), applying polishing compounds, and buffing the floor to a high shine. The exact steps, and tools used, will vary, depending on the type of flooring being polished, and the results that you want to achieve.
Types of Floors That Can Be Polished
Many types of floors can be polished, including hardwood, stone, concrete, and tile. Each type of flooring requires different techniques, and materials, to achieve the best results, which is why it is important to use a professional installer, who is familiar with all of these processes. With the right tools, and techniques, just about any floor can be polished to a brilliant shine.
Why Polish Your Floors?
Aesthetic Appeal
One of the primary reasons to polish your floors, is to enhance their aesthetic appeal. Polishing will create a smooth, glossy, and reflective surface, that will make your floors look more elegant, and sophisticated, and will also impress visitors to your home, or business. It is a great way to increase the value of your property, and to create a more inviting atmosphere.
Protection and Longevity
Polishing your floors, will also protect them from wear and tear, and will greatly extend their lifespan. The polishing process will seal the surface, and will also make it more resistant to scratches, stains, and moisture damage. This will help to keep your floors looking their best for many years to come, and it will also save you money on repairs, and replacements.
DIY Floor Polishing: A Step-by-Step Guide
Gathering Necessary Tools and Materials
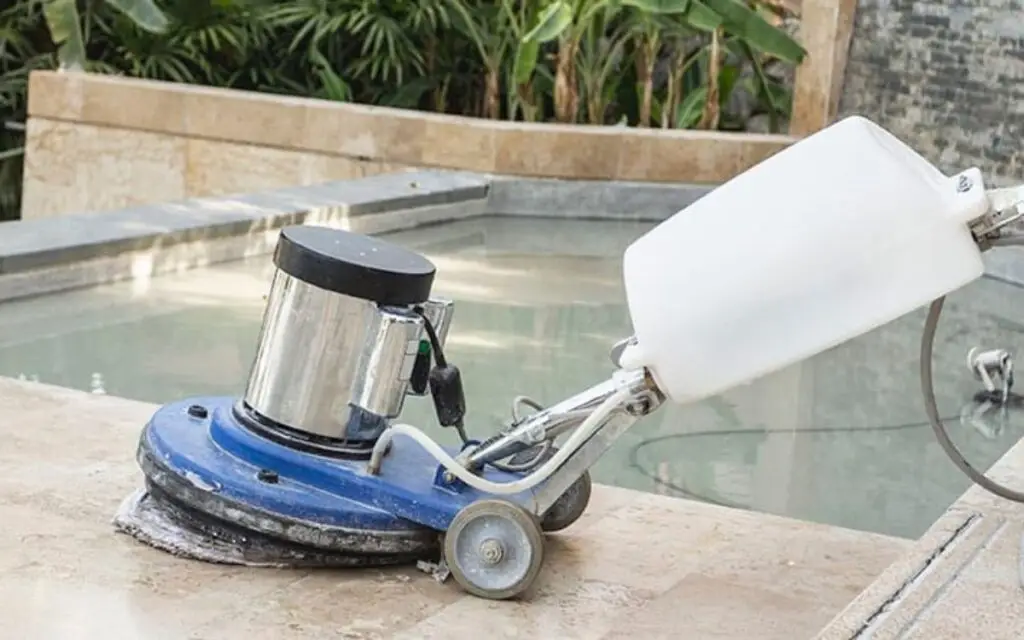
Polishing Machine
The most important tool for floor polishing is a high-quality polishing machine. There are several different types of polishing machines available, including rotary polishers, and orbital polishers, and the one you will need will depend on the type of flooring that you have. These machines can often be rented from your local hardware store, or tool rental company.
Polishing Pads
You will also need a variety of polishing pads, that are designed for different stages of the polishing process. Coarse pads are used for initial sanding, and cleaning, while finer pads are used for polishing and buffing. It is very important to use the correct types of pads, for your specific type of flooring, to avoid damaging the surface.
Cleaning Solutions
You will also need the correct types of cleaning solutions, to prepare the floor for polishing, and to remove any residue after the polishing process is complete. It is essential to only use pH-neutral cleaners, that are designed for your specific type of flooring. You should always avoid using any harsh chemicals, or abrasive cleaners, as these can cause damage.
Safety Gear
It is also very important to wear the proper safety gear, including safety glasses, a dust mask, and gloves, to protect yourself from dust, fumes, and any other hazards that may be present. It is also recommended to wear hearing protection, as some polishing machines can be quite loud, and if you will be working for extended periods of time, you will want to protect your ears.
Preparing the Floor
Cleaning and Repairing
Before you begin polishing, it is very important to thoroughly clean the floor, to remove any dirt, dust, debris, and waxes. You should also make any necessary repairs, such as filling in cracks or holes, and repairing any damage to the surface. Professional installers can always help you to prepare your floors, or they can also recommend the correct steps that you should take.
Sanding (If Necessary)
If your floors have scratches, or other imperfections, you may need to sand them, before polishing. This step will help to smooth out the surface, and will create a more even base for the polishing process. It is very important to use the correct grit of sandpaper, and to avoid over-sanding, as this can damage the floor.
Polishing Process
Applying Polishing Compound
After you have prepared the floor, the next step is to apply a polishing compound, which will help to smooth and shine the surface. You will want to follow the manufacturer’s instructions carefully, when applying the polishing compound, and be sure to use the correct amount, to avoid any streaking, or hazing.
Using the Polishing Machine
Using the polishing machine, you will need to work in small, overlapping sections, applying even pressure, to ensure a consistent finish. You should also move the machine slowly and steadily, to avoid any scratches, or swirl marks. Be sure to also follow the manufacturer’s instructions, for the specific type of polishing machine that you are using.
Buffing the Floor
After you have applied the polishing compound, and have used the polishing machine, you will need to buff the floor with a clean, dry polishing pad. This step will help to remove any remaining residue, and will also enhance the shine of the floor. It is very important to use a clean pad, to avoid re-depositing any dirt or debris, on the surface of the floor.
Finishing Touches
Cleaning and Sealing
After you have completed the polishing process, you should thoroughly clean the floor to remove any remaining polishing compound, or dust. Then, you will need to apply a sealer, to protect the floor from stains, and moisture damage, and you should always choose a sealer that is specifically designed for your type of flooring, and it is essential to follow the manufacturer’s instructions carefully, when applying the sealer.
Risks and Challenges of DIY Floor Polishing
Potential for Damage
Scratches and Swirl Marks
One of the biggest risks of DIY floor polishing, is the potential for damaging the floor, with scratches or swirl marks. This can occur if you use the wrong type of polishing pad, if you apply too much pressure, or if you do not move the polishing machine evenly. Once these types of scratches have been applied, they can be very difficult to remove, and may require professional assistance.
Uneven Finish
It is also easy to achieve an uneven finish with DIY floor polishing, especially if you are not experienced with the process. An uneven finish can make the floor look dull, and unprofessional, and will also greatly detract from the value of your home.
Safety Concerns
Equipment Handling
Floor polishing machines can be heavy, and difficult to maneuver, which can present a safety hazard, especially for inexperienced users. You should always follow all safety precautions, and wear the proper protective gear, when operating a polishing machine.
Dust and Fumes
The polishing process can also create a lot of dust, and fumes, which can be harmful to your health, if you are not properly protected. It is essential to wear a dust mask, and also to ventilate the area well, to minimize your exposure to these hazards.
Time and Effort
Physical Demands
Floor polishing is a physically demanding task, that requires a lot of bending, kneeling, and lifting. If you are not in good physical condition, it may be difficult for you to complete the job safely, and effectively. It is essential to take breaks as needed, and to ask for help, if you are feeling tired, or sore.
Learning Curve
There is also a significant learning curve, associated with floor polishing, and it may take some time to master the proper techniques. It is always wise to start with a small, inconspicuous area, to practice, before attempting to polish the entire floor.
Benefits of Professional Floor Polishing
Expertise and Equipment
Professional-Grade Polishers
Professional floor polishing services, have access to professional-grade polishers, and other specialized equipment, that are not typically available to the general public. These machines are more powerful, and more efficient, than consumer-grade models, and they can also help to achieve a more consistent finish.
Skilled Technicians
Professional technicians are highly skilled and trained in all aspects of floor polishing, and they know how to properly prepare the floor, select the best materials, and use the correct techniques to achieve optimal results. Their expertise will always guarantee a long-lasting, and beautiful, result.
Guaranteed Results
Consistent Finish
Professional floor polishing services can guarantee a consistent finish, that is free of scratches, swirl marks, and other imperfections. This is because they have the experience, and equipment, to achieve a uniform shine across the entire floor.
Protection and Longevity
Professional polishing will also provide added protection, for your floors, and will also help to extend their lifespan. This is because they use high-quality sealers and protective coatings, that will also make your floors more resistant to stains, scratches, and moisture.
DIY vs Professional Floor Polishing Costs
DIY Costs
Equipment Rental or Purchase
DIY floor polishing costs can range from $200 to $1000 or more, depending on whether you rent or purchase the equipment. Renting a polishing machine can cost anywhere from $50 to $100 per day, while purchasing a machine can cost several
FAQs & Answers
Floor polishing involves using specialized equipment and abrasive compounds to smooth and shine the surface of a floor. Common types of floors that can be polished include hardwood, stone, concrete, and tile. Each type of flooring will have its own specific method for polishing, to ensure the best results. Professional installers have the training and knowledge to be familiar with all of these methods.
The main benefits of polishing floors include enhancing their aesthetic appeal, by creating a glossy and reflective surface, and improving their protection and longevity, by sealing the surface and making it more resistant to scratches and stains. Professional installers know the proper sealing techniques and products to ensure your floors look great, and last a long time.
Essential tools and materials needed for DIY floor polishing include a polishing machine, various polishing pads, cleaning solutions, and safety gear. Depending on whether you rent or buy the equipment, expect to spend anywhere from $200 to $1000 or more. Professional installers, on the other hand, already have all of this equipment, and the cost is factored into the overall project price.
Potential risks and challenges with DIY floor polishing include the potential for damaging the floor with scratches or swirl marks, achieving an uneven finish, and safety concerns related to handling heavy equipment and exposure to dust and fumes. Because of these types of issues, professional installers often recommend that you leave this job for the professionals.
While DIY floor polishing may seem cheaper upfront, the potential for mistakes, the cost of equipment, and the limited lifespan of the results, often make professional floor polishing a more cost-effective option in the long run. Professional installers offer expertise, quality materials, and a guarantee on their work, ensuring a consistent finish, and protection from damage. This level of quality and protection is simply not available with DIY projects.


