Preparing for Tile Installation
Gathering Necessary Tools and Materials
Essential Tools for Tile Installation
Before beginning any tile installation project, it’s crucial to gather all the necessary tools. This includes a tile cutter or wet saw, notched trowel, level, tile spacers, rubber mallet, grout float, sponge, and measuring tape. Having all these tools readily available will help ensure a smooth and efficient installation process. Professional installers have all these specialized tools already, which allows them to complete the job efficiently and accurately, without the added expense or hassle of renting or buying the tools.
Choosing the Right Tiles and Adhesive
Selecting the right tiles and adhesive is essential for a successful installation. Different types of tiles require different adhesives, and the wrong combination can result in a failed installation. Consider factors like the material of the tile, the type of subfloor, and the intended use of the space when making your selections. Professional tile installers are knowledgeable about different tile types and adhesive requirements, ensuring the perfect match for your specific project and avoiding costly mistakes.
Surface Preparation
Cleaning and Leveling the Subfloor
Proper surface preparation is critical for a long-lasting and professional tile installation. The subfloor must be thoroughly cleaned to remove any dirt, debris, or grease. It also needs to be level to prevent any unevenness in the tile. Any imperfections in the subfloor can translate to problems with the final tile installation. Professional installers have the skills and equipment to ensure the subfloor is perfectly prepared.
Applying Underlayment if Necessary
In some cases, an underlayment is necessary to provide a stable and even base for the tiles. This is especially true if the subfloor is uneven or if you are installing tile over wood. The right underlayment can also provide extra insulation and soundproofing. Professional tile installers can assess if an underlayment is needed and ensure it is correctly installed, providing a solid base for your new tiles.
Step-by-Step Tile Installation Guide
Planning the Tile Layout
Measuring and Marking Guidelines
Before you start applying any adhesive, it’s important to plan the tile layout carefully. Start by measuring the area and marking guidelines on the floor or wall. This step will help you achieve a balanced and symmetrical look. Proper planning prevents awkward cuts and ensures that tiles are evenly distributed, resulting in a more professional and aesthetically pleasing final product. Professional installers create detailed plans prior to the install to avoid issues.
Dry-Fitting the Tiles
Dry-fitting the tiles involves laying them out without adhesive, and allows you to visualize the final layout and make necessary adjustments. This step also helps you to anticipate any cutting needs and avoid having oddly cut tiles in prominent places. Professional installers always dry fit the tiles to ensure the final layout is visually balanced and that all tiles are set correctly.
Applying Adhesive
Spreading Adhesive Evenly
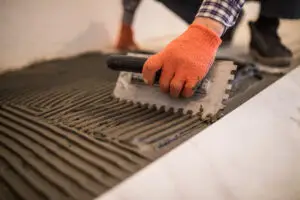
Using a notched trowel, spread the adhesive evenly across a small area of the subfloor or wall. Make sure the notches are the correct size for the type of tile you are installing. Applying adhesive too thickly or unevenly will cause the tiles to set poorly and create an unlevel surface. Professional tile installers are trained to apply the correct amount of adhesive evenly, which will ensure a flat and stable finish.
Setting the First Row of Tiles
Start by setting the first row of tiles along the marked guidelines. Press each tile firmly into the adhesive, using a slight twisting motion to ensure a strong bond. The alignment of this first row is critical, as the rest of the tiles will be based off it. Professional installers will make sure the first row is set perfectly so the rest of the project follows suit.
Setting the Tiles
Cutting Tiles as Needed
As you progress with your tile installation, you will likely encounter the need to cut tiles to fit around edges, corners, and other obstacles. Using a tile cutter or wet saw, make precise cuts. Inaccurate cuts will lead to uneven tile lines and a less-than-professional result. Professional tile installers are skilled in using these tools to make clean, accurate cuts.
Using Spacers for Even Gaps
Use tile spacers to ensure consistent gaps between tiles. This will create a uniform look and allow for the proper application of grout. Consistent grout lines are one of the key indicators of a professional tile job. Professional installers ensure consistent grout lines which not only look great, but also serve a structural purpose by preventing tiles from rubbing.
Grouting and Finishing
Applying Grout Evenly
Once the tiles have set, it’s time to apply the grout. Using a grout float, press the grout firmly into the gaps between the tiles, ensuring that all the joints are completely filled. Make sure to remove any excess grout from the surface of the tile. Uneven grout application will diminish the overall look of your tile project. Professional installers apply grout expertly, ensuring it is uniformly applied to all tile lines.
Cleaning Excess Grout
After applying the grout, wait for the specified time and then begin cleaning off the excess with a damp sponge. Work in a circular motion, being careful not to remove too much grout from the gaps. The grout should be smooth and flush with the tile surface. Professional tile installers know how to clean the grout effectively, leaving a smooth and polished finish.
Sealing the Grout
Once the grout has completely cured, apply a grout sealer. This will help to protect the grout from stains, moisture, and mildew. Sealing the grout is an essential step that will prolong the life of the tile project. Professional installers will make sure the grout is sealed correctly, ensuring it provides long-term protection.
DIY vs Professional Tile Installation: A Detailed Comparison
Risks of DIY Tile Installation
Potential Costly Mistakes
DIY tile installation is fraught with opportunities for errors, such as uneven tile lines, improperly applied adhesive, poor grout work, or incorrect cuts. These errors can lead to a subpar finish, which can be both unsightly and expensive to repair or replace. Professional installers have the experience and knowledge to avoid these costly mistakes.
The Importance of Precision
Tile installation requires a high degree of precision. Any inaccuracies in measuring, cutting, or setting the tiles will be apparent in the final product. Mistakes are far more common when attempting DIY tile installation, particularly if you’re not experienced. Professional installers are meticulous in their work and ensure a precise and polished finish.
Benefits of Professional Tile Installation
Expertise and Quality
Professional tile installers bring a wealth of experience and expertise to your project. They are trained in the best techniques and practices for tile installation and use quality tools and materials, ensuring a high-quality, durable, and beautiful finished product. They are also up-to-date on the latest trends in tile styles, adhesives, and grout.
Long-Term Cost Savings
While professional tile installation may involve a higher upfront cost, it often results in long-term cost savings. By avoiding costly mistakes and ensuring a proper, long-lasting installation, professionals can help prevent the need for future repairs or replacements. A professional installation is also less likely to require significant repairs, saving money in the long run.
Case Studies: DIY Gone Wrong vs. Professional Success
Example of Uneven Tile from DIY
A homeowner attempted a DIY tile installation to save money. They struggled with measuring and cutting the tiles, resulting in uneven grout lines, lippage and an unprofessional look. The uneven tiles were not only unsightly, but they were also a safety hazard. They eventually had to hire a professional to correct the mess and redo the job, which added to their costs.
Example of a Perfect Professional Job
Another homeowner hired a professional tile installation service. The professional installers created a detailed plan, properly prepared the subfloor, precisely installed the tiles and applied the grout with extreme precision. The end result was a beautifully tiled space that added value and beauty to their home. The homeowner saved time, avoided a headache, and benefited from high-quality, professional work.
FAQs & Answers
While being handy is a great start, tile installation requires specific skills and knowledge that go beyond general DIY abilities. Achieving a professional finish involves precise measuring, cutting, and leveling, and without experience, it’s easy to end up with uneven tiles, poor grout lines, and a result that doesn't look quite right. These issues can lead to costly repairs and the need to redo the entire job, which is why most homeowners turn to professional tile installers.
Many DIYers make mistakes like using the wrong type of adhesive for their tile or subfloor, not properly preparing the subfloor, or applying too much or too little grout. These errors can result in loose or cracked tiles, water damage, and a job that needs to be redone. A professional installer knows how to avoid these common mistakes, and they have the right tools and experience to ensure a high-quality and long-lasting installation.
The time it takes to complete a tile project can vary greatly between DIY and professional installation. What might take you several days, or even weeks as a DIYer due to mistakes, tool rentals, and learning curves, a professional installer can often complete in a day or two. Professionals are experienced, efficient, and have the manpower needed to complete the job quickly without compromising on quality.
The cost of hiring a professional tile installer is an investment that often pays off in the long run. Not only does a professional ensure a high-quality and aesthetically pleasing result, but they also minimize the risk of costly mistakes, and offer warranty coverage for their services. This means you won't have to worry about fixing problems or replacing damaged materials, making the extra expense worth the investment in the long run.
Professional tile installation services often come with warranties that protect your investment. This warranty typically covers both the workmanship and the materials, providing you peace of mind in case any issues arise due to the installation. Most DIY projects don’t come with guarantees, so if something goes wrong, it’s all on you. When you hire a professional, you are choosing expertise, reliability, and protection.


