Introduction to Tile Installation Methods
Tile installation requires choosing the right method to ensure durability and visual appeal. Whether you’re working on floors, walls, or countertops, each technique offers unique advantages depending on the surface, tile type, and application. Here’s a breakdown of the most effective methods to help you achieve professional-quality results.
Thin-Set Tile Installation
Thin-set mortar is the most common and versatile tile installation method.
What is Thin-Set Mortar?
Thin-set is a cement-based adhesive that provides a strong bond between tiles and the substrate.
Benefits of Thin-Set Method
- Ideal for most surfaces, including floors and walls.
- Suitable for ceramic, porcelain, and natural stone tiles.
- Durable and moisture-resistant.
Step-by-Step Thin-Set Application
- Mix thin-set mortar to a peanut butter-like consistency.
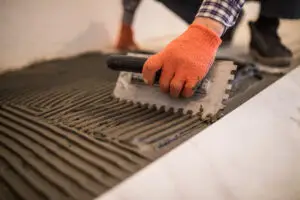
- Spread it evenly using a notched trowel.
- Press tiles firmly into place, ensuring proper alignment.
- Allow the mortar to cure before grouting.
Mortar Bed Installation Method
This traditional method provides a stable base for tiles, especially on uneven surfaces.
When to Use a Mortar Bed
- For areas with significant surface irregularities.
- When installing large, heavy tiles or natural stone.
How to Apply a Mortar Bed
- Mix mortar to a workable consistency.
- Spread a thick layer over the surface, leveling it as you go.
- Embed tiles into the mortar, using spacers to maintain uniform gaps.
Adhesive Tile Installation
Pre-mixed adhesive is an excellent option for smaller projects, particularly on walls.
Advantages of Adhesive Method
- Quick and convenient for lightweight tiles.
- Minimal cleanup compared to mortar.
Using Adhesive for Tile Installation
- Apply adhesive with a notched trowel.
- Press tiles gently into place.
- Avoid using adhesive on floors unless specified by the product.
Floating Tile System
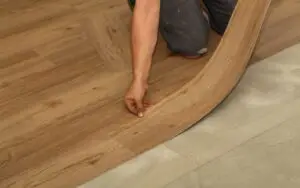
This innovative method simplifies installation by using interlocking tiles that don’t require adhesive or mortar.
What is a Floating Tile System?
A system where tiles snap together and rest on an underlayment, rather than being permanently fixed.
Benefits of Floating Tiles
- Ideal for temporary installations or rental spaces.
- Can be installed quickly without specialized tools.
How to Install Floating Tiles
- Lay the underlayment for cushioning and stability.
- Connect the tiles using their interlocking edges.
- Trim tiles at edges and corners for a perfect fit.
Dry-Lay Tile Method
The dry-lay method involves arranging tiles without adhesive to test the layout and design.
Benefits of Dry-Laying Tiles
- Ensures a balanced layout with minimal cuts.
- Highlights potential issues before permanent installation.
Steps for Dry-Laying Tiles
- Measure and mark the center of the area.
- Lay tiles from the center outward, adjusting as needed.
- Finalize the layout before applying adhesive or mortar.
Specialized Techniques for Walls vs Floors
Tiling walls requires different tools and techniques compared to floors.
Wall Tiling Tips
- Use lightweight tiles to prevent slippage.
- Apply adhesive vertically to create a strong bond.
Floor Tiling Tips
- Use thin-set mortar for durability.
- Check alignment and level frequently to avoid uneven surfaces.
Preparing the Subfloor for Installation
Subfloor preparation is essential for any method.
Cleaning and Leveling
- Sweep and clean the surface thoroughly.
- Use a leveling compound to fix uneven areas.
Addressing Moisture Issues
- Install a moisture barrier for wet areas like bathrooms or kitchens.
Grouting and Sealing After Installation
Grouting and sealing complete the installation process.
Applying Grout
- Mix grout to a creamy consistency.
- Use a grout float to press grout into gaps.
Sealing Tiles and Grout
- Apply a sealant to protect against stains and moisture.
- Reapply sealant periodically for long-term durability.
Common Mistakes to Avoid During Installation
- Skipping Subfloor Preparation: Leads to cracked tiles.
- Using the Wrong Method: Each method suits specific tile types and surfaces.
- Inconsistent Adhesive Application: Can cause tiles to loosen over time.
DIY vs Professional Tile Installation Methods
While DIY methods can save costs, professional installation ensures precision and longevity.
Risks of DIY Installation
- Misalignment or improper adhesive use.
- Difficulty handling large or intricate tiles.
Benefits of Professional Services
- Expertise in choosing the right method for your project.
- Access to advanced tools and techniques.
Example: A homeowner struggled with uneven tiles using the adhesive method on a bumpy floor. A professional replaced the adhesive with a mortar bed, resulting in a flawless and durable finish.
Choose the best tile installation method for your project or consult a professional for a guaranteed flawless result!
FAQs & Answers
Thin-set mortar is the most widely used method due to its strength and versatility.
Yes, the mortar bed method is ideal for leveling uneven surfaces.
A method where tiles are laid without adhesives, often using interlocking edges.
Adhesive is primarily for walls or small tiles; use thin-set mortar for floors.
Yes, sealing protects grout and tiles from moisture and stains.


